If you've found a bug with a fix that hasn't been pushed into mainline yet, the fastest way to get it there is to review the code.
Doing Reviews
We require two reviews of a branch before it can be merged and we welcome reviews, even if you're not very familiar with the code base (after all, we all start somewhere).
If you hop in the IRC channel (#storm), you'll often find someone who will be happy to perform the second review, helping push it forward for you.
So what does a review entail?
We do reviews with Launchpad's review system. If you visit this page: https://code.edge.launchpad.net/~jamesh/storm/bug-242813/+merge/10508 You can add your review as a comment. If you have nothing to add, ie: you're happy with the branch, add a comment with '+1' and an 'Approved' status.
What should you be looking for?
You want to run the tests and make sure they pass.
It's important to understand the patch and make sure it solves the problem effectively.
Also, pay attention to test coverage, making sure that the changes are well exercised by the test suite.
It's perfectly acceptable to make comments and also ask questions if there are parts of the code you don't understand.
Although it isn't in the packages, the test suite comes along with the rest of the code when you pull the bazaar branch from launchpad. No install is needed in order to run the tests, so it will happily coexist with an installed Storm package.
More details about running tests can be found in the Test Setup section, below.
Test Setup
Executing the test suite is simple: just enter the root directory of your local branch and run 'make check'.
For this to work, however, you'll need some local databases in place to exercise MySQL and PostgreSQL parts of the test suite. (If you look in the Makefile you can see the expected names defined at the top of the file.)
You can use a remote server for the STORM_MYSQL_HOST_URI, but the test suite currently assumes that you have a local server running.
Doing so is as simple as installing a couple packages from the main repository (mysql-server and postgresql), so that is the suggested way of doing things.
In addition to the database servers, we also need to install the different python database drivers. The instruction (tested on Ubuntu 9.04 Jaunty) follow:
Open Synaptic Package Manager to install the database drivers (python-mysqldb, python-psycopg2) and the database servers (mysql-server, postgresql). This can, of course, also be done from the command line:
$ sudo apt-get install python-mysqldb python-psycopg2 mysql-server postgresql
These will take a few minutes to download (its a bit under 200MB all together)
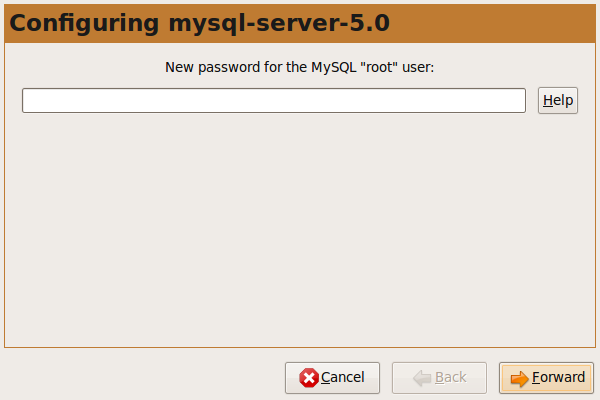
Once the download is complete, a window will pop up called "configuring mysql-server-5.0"

Leave the password field blank and click "Forward"
The install will continue, and it will (again) ask for a root password. Once again, leave the field blank and click "Forward"
Once the install has finished, it will "set up" the mysql packages. At this point, it will ask for a root password one last time. Again, click "Forward"
The synaptic install should now be finished.
There is one PostgreSQL configuration file that needs to be tweaked. Open it with:
$ sudo gedit /etc/postgresql/8.3/main/pg_hba.conf
and ensure that the following line is present
host all all 127.0.0.1/32 trust
This will probably (with PostgresSQL 8.4) entail changing 'md5' to 'trust'. Save and close, then restart the server:
$ sudo /etc/init.d/postgresql-8.3 restart
Next, you probably noticed that, while MySQL asked us about a root user three times, PostgreSQL didn't ask us at all. Lets create our PostgreSQL user now.
As noted in the Ubuntu PostgreSQL documentation, the easiest thing is to create a user with the same name as your username. To do this, open a terminal and enter:
$ sudo -u postgres createuser --superuser $USER
Despite having created our root user already, MySQL requires an extra step. First we start mysql as the root user (which, you may recall, has no password) with:
$ mysql -u root
Then we create a new user. Be sure to replace yOuR_uSeRnAmE with your actual user name (leaving the quotes in place).
mysql> GRANT ALL PRIVILEGES ON *.* TO 'yOuR_uSeRnAmE'@'localhost' IDENTIFIED BY '' WITH GRANT OPTION;
Next, we'll need to create the storm test databases (aptly named "storm_test")
While still at the MySQL command prompt run:
mysql> CREATE DATABASE storm_test CHARACTER SET utf8;
use Ctrl+D to exit, then, once back on the standard terminal, run the command for PostgreSQL:
$ createdb storm_test
Finally, its time to run the tests!
Go into the base directory of the storm branch you want to test, and run:
$ make check
This will produce a lot of output. It may be easiest to save this to a file, which can be later reviewed for errors:
$ make check &> ../test_results.txt